Contents
- Index
- Previous
- Next
Please read this part of the Help file - at least:
Quick Starts: Go HERE
This an overview of how to use the program and the simple steps needed.
Using in Start/Stop mode {Menu}Action>Start|Stop = checked
TIP: When you're experimenting, set the maximum time span to 15 minutes. You can see things happening much easier that way and you don't have to wait so long for events.
Note: You can't work in real times unless the sequence is running and it can't be running unless there's a timer. To work in real times, add a timer then click the start button. If you want it to automatically start as soon as you add a timer, make sure the File>Auto start item is checked.
Using in Auto start mode: {Menu}File>Auto start
1)Roughly work out the maximum time from 'now' to the last alarm you need. Select the nearest time greater than your estimate from the drop down list  . Click the down arrow (in the program) for times other than 2 hours.
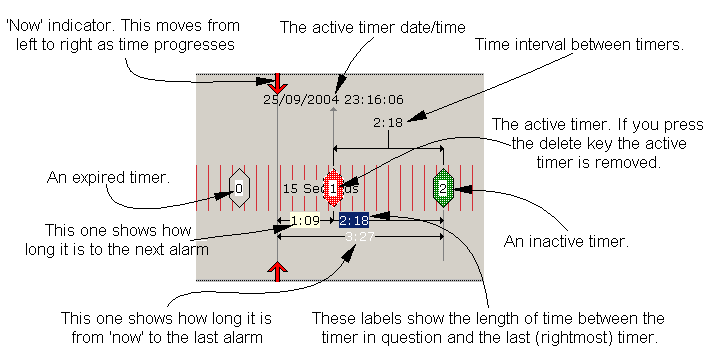
Descriptions of the important elements.
2)Having decided how many timers you want; click one of the toolbuttons marked 1, 2, 3 or 4.
Note 1: Just like a regular kitchen timer the time starts ticking away as soon as you set the first time so make your adjustments straight away.
3)Click and drag a timer to the longest cook time you need to cook for. That's the time displayed at the very bottom in the diagram
4)Move the other timers using either the interval, the actual time as shown on the active timer date/time or as shown 'from now' below the timer for guidance. If you want to move all the timers to the right of the active one by the same amount, hold the shift key down as you do the move. see Moving timers for ways of moving timers using the keyboard.
Tip: Take a bit of time to read about locking timers. Locking can prevent mischievous little fingers and wandering paws from changing settings or closing the program prematurely.
You can use your mobile phone as an alarm, see Options and the Dialup menu
Using in Start/Stop mode :
1) Clear the workspace (File>New) and make sure File>Auto start is unchecked.
2) Having decided how many timers you want; click one of the toolbuttons marked 1, 2, 3 or 4. Clicking these buttons again adds 1, 2, 3 or 4 more timers.
3) Left mouse down over the timer/s and drag to the required interval/s.
4) When you're ready to start the timing sequence; {Menu}Action>Start, the red start button or press the space bar.
To stop the timing sequence; {Menu}Action>Stop or click the stop button. You can't stop Start/Stop timing sequences by using the space bar, you must use the menu or the buttons. This is a safety precaution to prevent accidental termination of a timing sequence.